This is an old revision of the document!
Table of Contents
迷你私有雲
「迷你私有雲」2.5吋網路伺服器,搭配「Myakitio平台」、並具有擴充成網路陣列儲存系統的功能! 我們的「Myakitio平台」提供安全可靠的網絡存儲功能,再加上可以將內容輕鬆分享給您的家人和朋友,幾乎任何人都可以做到這一點。 能將您存放在內部的影片、照片、音樂等檔案,透過DLNA模式分享出來,讓您的PS3、XBOX360等裝置不需任何改裝,即可連結到「MyCloud Mini」中的目錄,直接存取播放您收藏的音樂影片喔。 當您購買「MyCloud Mini」開箱後,需要一條可以直接上網的網路連接孔,像是IP分享器或路由器上所提供網路連接孔,然後透過網路線與「MyCloud Mini」連接並接上電源,電源啟動後前方的燈號一開始會閃爍,當燈號恆亮時表示系統已開機完成,你可以進行登入並開始使用。
| CPU |
|
| 記憶體 |
|
| 支援硬碟 |
|
| 前方面板 |
|
| 後方面板 |
|
正立面

| 藍燈閃爍 | 系統正在開機中。 |
| 藍燈 | 系統開機完成。 |
| 紅燈 | 系統錯誤。(系統無法啟動) |
後立面

| | 電源按鈕 |
| DC 5V | 電源連接座 |
| | USB 2.0 主機端連接埠 |
| eSATA | eSATA 主機端連接埠 |
| 10/100/10000 | Gigabit 網路連接埠 |
| Reset | 重置按紐 |
| | 安全鎖槽 |
Power ON/OFF Procedure
Connect the power supply to your device first and only then plug it into the wall outlet. The system starts up automatically as soon as you plug in the power supply. It takes about 1-2 minutes for the device to go online but the blue system LED will indicate when the system is ready.
To safely turn off the device, press and hold the power button for about 4 seconds until the red LED starts flashing. The system will then shut down all services and about 20 seconds later, it will power down.
If for some reason the system is unresponsive, press and hold the power button for 6 seconds to forcefully shut down the system and cut off the power.
HDD Installation
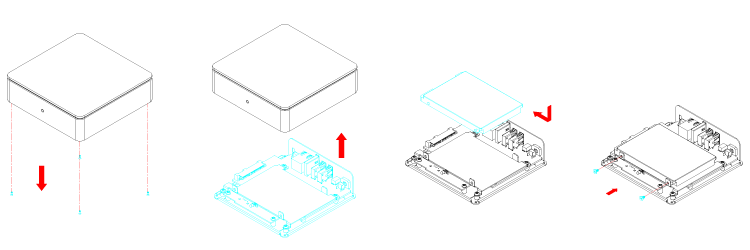
Remove the screws on the bottom of the case and lift up the top of the enclosure. Install the hard drive in the HDD chassis and fasten the screws on the side to hold it in place.

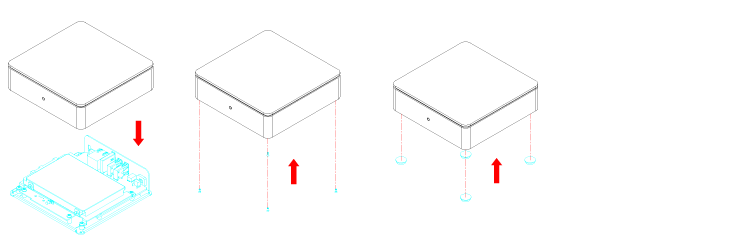
Replace the top enclosure. Fasten the screws on the bottom of the case, place the rubber feet over the screws and stick them on the casing to cover the screws.

